TL;DR
A closet rig can work wonders for soundproofing and acoustics if you focus on the right placement, materials, and ventilation. Moving the rig out of your main space is the most effective way to cut noise, while targeted treatment reduces reflections and boominess inside the closet.
Ever wonder if your tiny closet can double as a vocal booth or a quiet workspace? It can. The secret isn’t just slapping foam on the walls or sealing the door. It’s about understanding how sound moves, where to treat, and how to set up your space for both noise reduction and great acoustics. This guide strips away the guesswork—whether you’re building a DIY closet studio or just trying to tame noise from your gaming rig.
By the end, you’ll see that the best fix might be moving your rig altogether, and that a closet can be a surprisingly effective spot, if you treat it right. Ready to turn that cramped space into a quiet sanctuary? Let’s go.
Acoustic dampening
& the rig in the closet.
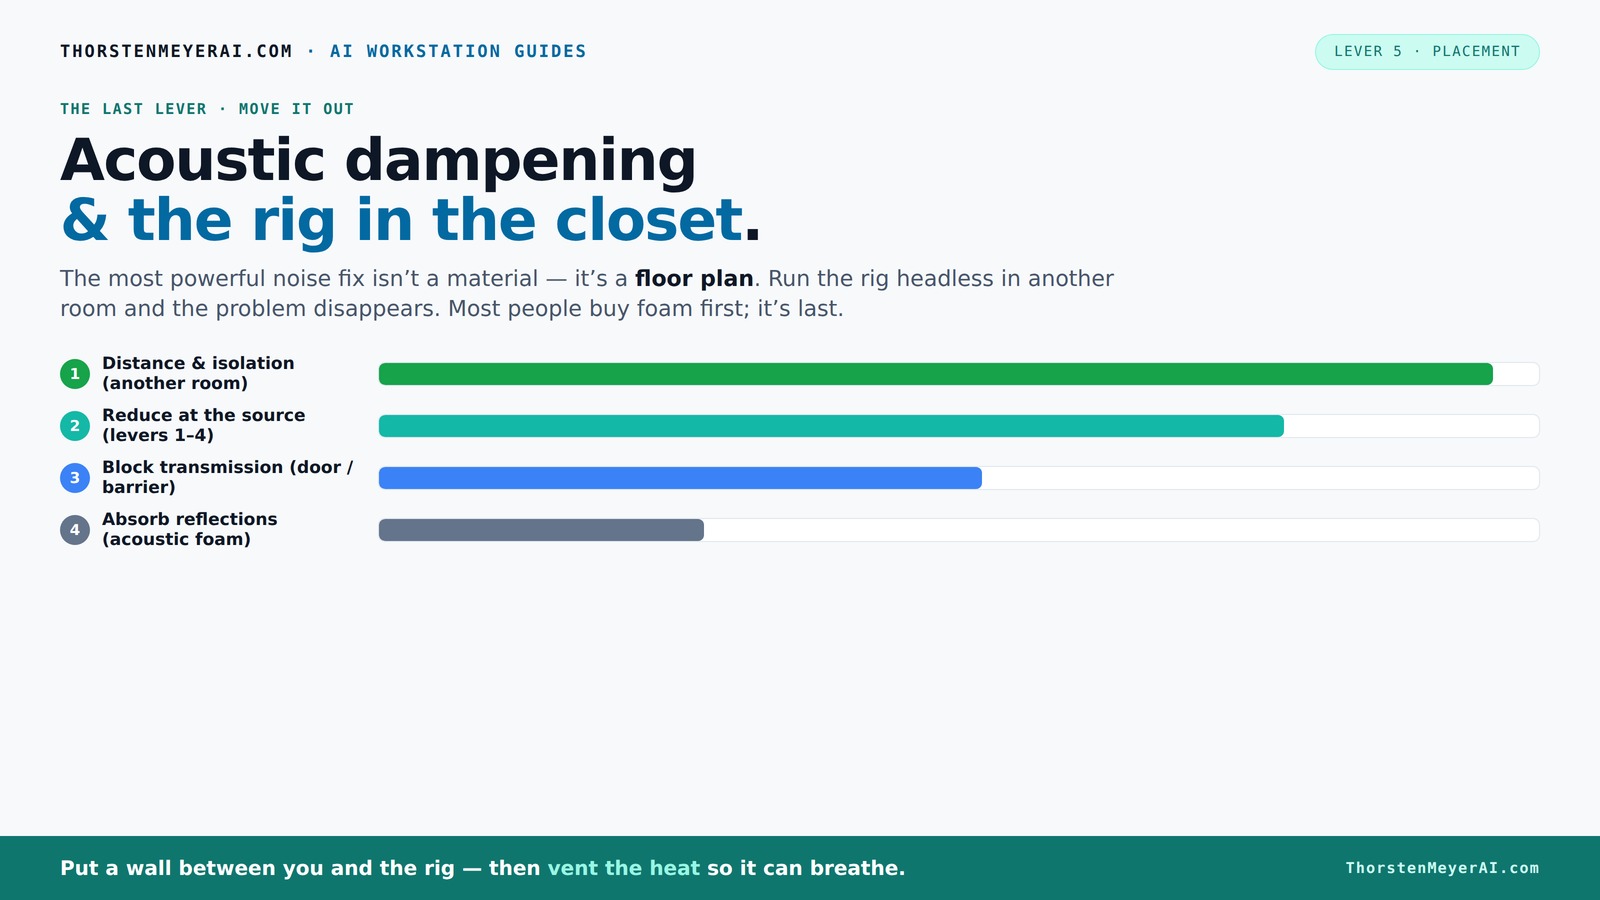
The most powerful noise fix isn’t a material — it’s a floor plan. A rig you can’t hear because it’s in another room beats any amount of foam. Tap the approaches in Part 1 to see what actually works.
(another room)
(levers 1–4)
(door / barrier)
(acoustic foam)
Contain the noise, not the heat
Key Takeaways
- Moving your rig into a different room or closet is the most effective noise reduction strategy.
- Treat reflections at the first contact points—walls, ceiling, and corners—for clear, natural sound.
- Seal gaps around doors, windows, and seams to drastically cut outside noise leaks.
- Use bass traps in corners to tame low-frequency muddiness common in small spaces.
- Ensure proper ventilation when placing a hot, high-power machine in an enclosed space—heat kills equipment and performance.

Focusound 52 Pack Acoustic Foam Panels 1" x 12" x 12" Sound Proof Foam Panles Soundproofing Noise Cancelling Wedge Panels for Home Office Recoding Studio with 300PCS Double-Side Adhesive
- Soundproofing Design: Triangular grooves for noise absorption
- Includes Adhesive Tape: 300pcs double-sided adhesive for easy installation
- Easy Shape Recovery: Reverts to shape after soaking in water
As an affiliate, we earn on qualifying purchases.
As an affiliate, we earn on qualifying purchases.
What Is a 'Rig in the Closet' and Why It Works
A 'rig in the closet' means placing your computer, audio gear, or AI workstation inside a small, enclosed space for noise control. The idea is simple: keep the noise away from your ears by isolating it. If you’re running a high-power GPU or CPU 24/7, it’s loud—think of it like a jet engine in a tiny closet.
But the magic lies in how you position and treat that space. Moving the rig into a closet doesn’t just hide the noise; it allows you to control reflections, reduce echoes, and cut sound transmission. Plus, you can treat the space with materials designed to absorb or block sound, making it almost silent from the outside. It’s a low-cost, space-efficient solution that turns a noisy problem into a quiet corner.
Acoustic Dampening vs. Soundproofing: What’s the Difference?
Before you start, know the difference. Acoustic dampening reduces echo and flutter inside the closet by absorbing sound waves, which makes recordings clearer and prevents the space from sounding hollow or boxy. Think of it as softening the interior to prevent sound from bouncing chaotically. Soundproofing, on the other hand, aims to prevent sound from leaking out or entering—it's about adding mass, sealing gaps, and creating barriers that block sound transmission.
This distinction matters because each approach has tradeoffs. Acoustic dampening is easier and cheaper, but it doesn’t stop noise from escaping or coming in. Soundproofing is more involved and costly but essential if external noise is a problem. For a closet rig, a balanced combination—treating internal reflections and sealing leaks—provides the best environment. Without proper soundproofing, external noise can ruin recordings, but neglecting acoustic treatment inside can make your audio sound unnatural or echoey.
According to experts, effective soundproofing can reduce noise transmission by up to 80%, but it requires more effort and investment than internal acoustic treatment alone. Understanding when to focus on each helps optimize your setup without unnecessary expense or complexity.
Best Materials for a Closet Rig: What Works and What Doesn’t
Choosing the right materials is key. For dampening reflections, thick foam panels, moving blankets, and bass traps do the heavy lifting because they absorb specific frequencies and reduce echo. These materials are essential for creating a balanced sound environment inside the closet, preventing the space from sounding hollow or boomy. For soundproofing, consider sealing cracks with acoustic sealant, adding mass with drywall or Green Glue damping compound, and using weatherstripping on the door to block sound leaks. These steps are crucial for keeping external noise out and internal sound contained.
Here’s a quick rundown of effective materials:
| Material | Purpose | Pros | Cons |
|---|---|---|---|
| Acoustic foam panels | Absorbing echoes | Lightweight, easy to install, cost-effective | Doesn’t significantly block sound transmission between spaces |
| Moving blankets | Both dampening and some soundproofing | Cheap, versatile, easy to hang | Less effective at blocking sound than dedicated barriers; bulkier |
| Mass-loaded vinyl | Soundproofing | Highly effective at blocking sound transmission | Heavy, more expensive, requires careful installation |
| Green Glue damping compound | Adding mass between drywall layers | Boosts wall mass, improves sound isolation | Requires some DIY effort and patience to apply correctly |
For bass control, bass traps placed in corners are essential. They target low frequencies that tend to pile up in small spaces, causing muddy, boomy sounds. Proper placement in corners ensures these frequencies are absorbed before they bounce around, improving clarity. Combining bass traps with ceiling treatment or heavy drapes overhead can further tame reflections and prevent flutter echoes, especially in tiny closets where every surface influences sound.
Where to Place Acoustic Panels for Maximum Effect
Placement is everything because the effectiveness of acoustic panels depends on where sound hits first and how it reflects within the space. In small closets, panels should be placed at the primary reflection points—these are the spots where sound waves from your speakers or microphone first bounce after leaving their source. Typically, this is at ear or mic height, roughly 4 to 6 feet high, where reflections are most likely to cause muddiness or echo.
Common spots include: placement tips.
- Side walls facing the speaker or mic, to absorb direct reflections
- The wall behind the mic or speaker, to prevent reflections bouncing back into the mic
- Corner bass traps, to absorb low-frequency buildup that tends to concentrate in corners
- Ceiling panels, to reduce flutter echoes and help control reflections from above
In a tiny closet, coverage is more important than symmetry. Target the areas where sound energy is most concentrated, rather than scattering panels randomly. Think of it as intercepting the sound’s first collision points to prevent reflections from bouncing back and creating a boxy, echo-heavy sound. Using a mirror or flashlight at ear level can help identify these reflection points—when you see a panel, you’re blocking a primary reflection path, which significantly improves clarity.
Treating the Door, Ceiling, and Floor: The Hidden Keys
The door often becomes the biggest leak point—sound and noise escape through gaps and cracks. Sealing these with weatherstripping and acoustic caulk can drastically reduce noise transmission, making your setup much quieter externally. For the ceiling, hanging a thick blanket or installing foam tiles can absorb flutter echoes, especially in small, enclosed spaces where sound can bounce rapidly. The floor can also trap sound, especially on hard surfaces like wood or tile. Adding thick carpets, rugs, or anti-vibration pads beneath your desk and equipment can reduce structure-borne noise, which often escapes through floors.
For more advanced solutions, installing a floating floor or resilient channel system can provide significant soundproofing benefits, but these require more effort and investment. Remember, sealing cracks and gaps is the low-hanging fruit—tiny openings can leak significant noise, so ensure seams, edges, and seams are properly sealed for maximum benefit.
Common Mistakes That Sabotage Your Closet Setup
One of the most common errors is over-treating with foam panels. While it might seem intuitive to cover every inch, excessive foam can deaden the sound too much, leading to a boxy, unnatural tone that hampers natural recording or listening. In a small space, this over-absorption reduces the natural sense of space and can make your recordings sound overly dry or muffled. It’s about balancing absorption with natural acoustics. Another mistake is sealing the space without proper ventilation. Trapped heat from high-power equipment can cause thermal throttling, reduce performance, and even damage your gear. Always incorporate passive vents or quiet fans, and consider heat dissipation strategies to keep your setup safe and efficient.
Finally, relying solely on soundproofing materials without addressing internal reflections results in poor sound quality. Blocking sound leaks is important, but if reflections inside the closet aren’t managed, recordings will still sound echoey or unnatural. Combining dampening with soundproofing is essential—each addresses different issues for a balanced, functional space.
Your FAQs: Quick Answers for Common Closet Rig Questions
Can a closet really work as a vocal booth?
Yes, with proper treatment and sealing, a closet can be surprisingly effective as a vocal booth. The key is to focus on absorption materials to control reflections and sealing all leaks to prevent outside noise from seeping in. While it’s not as ideal as a dedicated vocal booth, a well-treated closet can produce clear, professional-sounding recordings, especially if you optimize placement and materials.
Do I need soundproofing or just acoustic treatment?
Both are important but serve different purposes. Acoustic treatment inside the closet, like foam panels and bass traps, improves sound clarity by reducing internal reflections. Soundproofing—sealing gaps, adding mass—prevents external noise from entering and escaping. For best results, combine both approaches based on your noise environment and recording needs.
Where should I place panels in a closet?
Place panels at the first reflection points—these are the spots where sound first bounces after leaving your microphone or speakers. Typically, this is at ear or mic height, on side walls, behind the mic, and in corners for bass trapping. Proper placement ensures you’re intercepting the most problematic reflections, leading to clearer recordings and a more natural sound.
How much coverage do I need?
Cover at least 30-50% of the wall area where sound hits first, and include bass traps in the corners. More coverage generally improves clarity and reduces echoes, but avoid overdoing it, which can make the space sound unnaturally dead. Focus on critical reflection points for the best balance of absorption and natural acoustics.
Is it worth treating the door, ceiling, and floor?
Absolutely. Sealing gaps around the door and adding treatment to the ceiling and floor significantly reduces sound leaks and internal reflections. Properly addressing these surfaces ensures your closet setup remains as isolated and acoustically controlled as possible, resulting in better sound quality and less external noise intrusion.
Conclusion
Transforming a closet into a quiet, functional workspace isn’t about endless foam or sealing every crack — it's about smart placement, thoughtful treatment, and good ventilation. Moving the rig out of your main area might be the simplest and most effective fix. From there, targeted acoustic treatment and sealing turn that cramped closet into a surprisingly capable studio or server room.
So, next time noise is driving you crazy, ask yourself: can I just move it? Sometimes, distance really is the best soundproofing you'll find. Your workspace — and your sanity — will thank you.