Hello and welcome as I lead you on a thrilling journey inside the cockpit of a glider. Make sure to fasten your seatbelt as we explore the intricate features of this amazing aircraft.
From pre-flight checks to post-flight procedures, we’ll delve into every aspect of this adrenaline-fueled adventure.
Get ready to experience the thrill of takeoff, navigate the skies, and even master some daring aerobatics.
Join me as we uncover the secrets of the glider cockpit in this detailed tour.
Let’s fly high and embrace the freedom of the skies!
Key Takeaways
- Pre-flight procedures and safety are essential to ensure a safe and successful flight, including inspecting control surfaces, familiarizing with emergency procedures, and securing the harness tightly.
- Effective communication, both through hand signals and radio transmissions, is crucial for coordination with the ground crew and tower during takeoff.
- Climbing and considering weather conditions play a significant role in the flight, requiring adjustments in airspeed and pitch angle, utilizing thermals and updrafts, and making informed decisions based on wind direction and potential weather hazards.
- Navigation and flight instruments, such as the airspeed indicator, altimeter, variometer, and turn and bank indicator, are vital for safe and efficient flight, relying on them for navigation and control.

Veken 10 Set/8 Set Packing Cubes for Travel Essentials,Anti-Wrinkle Buckled Suitcase Organizer for Shoe & Toiletry Bag,Carry On Luggage Bag for Airplane & College Dorm Room Accessories,Women Men Gifts
- Stress-Free Packing: Organize and locate items easily
- Durable Materials: Made with twill polyester fabric
- Smooth, Reliable Zippers: Two-way metal zippers for easy use
As an affiliate, we earn on qualifying purchases.
The Basics of a Glider Cockpit
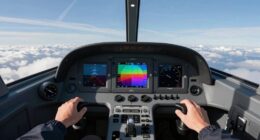
The glider cockpit contains the basic instruments needed for safe flight. As a glider pilot, I rely on these instruments to provide me with crucial information during my flights. The cockpit layout is designed to ensure that these instruments are easily accessible and can be monitored without distracting me from flying the glider.
At the center of the cockpit, I have the airspeed indicator, which displays my current airspeed. This instrument is vital for maintaining the correct speed during different phases of flight. To the left of the airspeed indicator, I have the altimeter, which tells me my current altitude above sea level. This is crucial for navigation and for maintaining the proper altitude during flight.
On the right side of the cockpit, I have the variometer. This instrument indicates the rate of climb or descent, allowing me to find thermals and maintain efficient flight. Next to the variometer, I have the turn and bank indicator, which shows the coordination of my turns and helps me maintain proper control.
Transitioning into pre-flight checks and safety procedures, it is essential to ensure that all these instruments are functioning properly before each flight.
Pre-Flight Checks and Safety Procedures
Before taking off, make sure to complete all pre-flight checks and follow the necessary safety procedures. As a glider pilot, ensuring the proper functioning of pre-flight equipment is crucial to a safe and successful flight. This includes inspecting the glider’s control surfaces, such as the ailerons and elevator, to ensure they move freely and without any obstructions. It is also important to check the condition of the glider’s canopy, ensuring it is properly secured and free from any cracks or damage. Additionally, inspecting the tow hook for any signs of wear or damage is essential, as it is a vital component in the glider’s launch system.
In the event of an emergency during flight, being prepared with an appropriate emergency response is paramount. Familiarize yourself with the emergency procedures specific to your glider, including how to handle situations such as a rope break during launch or a sudden loss of altitude. It is also important to have a thorough understanding of the glider’s emergency equipment, such as the location and operation of the emergency parachute. By being knowledgeable and prepared, you can ensure a swift and effective response in the event of an emergency.
Now that all pre-flight checks and safety procedures have been completed, it’s time to get ready for takeoff.
Getting Ready for Takeoff
When preparing for takeoff in a glider, there are a few crucial steps to ensure a safe and successful flight.
First, I strap myself securely into the glider, making sure all harnesses are properly fastened and adjusted. This is essential for maintaining control and stability during the flight.
Additionally, clear and effective communication with the ground crew and tower is vital. I use a combination of hand signals and radio transmissions to relay important information, such as my intentions for takeoff and any potential issues or concerns.
This ensures that everyone involved is on the same page and allows for a coordinated and smooth departure.
Strapping into the glider
Once you’re ready to strap into the glider, make sure to secure your harness tightly for safety. The harness is a crucial part of your equipment, ensuring that you stay securely fastened during the flight. Here are a few key steps to prepare your equipment and take necessary safety precautions:
- Ensure that the harness is in good condition, with no signs of wear or tear.
- Double-check that all buckles and straps are properly connected and adjusted to fit snugly.
- Familiarize yourself with the emergency release mechanisms, located within easy reach.
- Make sure that any loose objects, such as phones or cameras, are securely stowed away to prevent them from becoming hazards during the flight.
Strapping into the glider is just the first step in ensuring a safe and enjoyable flight. Next, we will discuss the importance of clear communication with the ground crew and tower, allowing for a smooth takeoff and landing without any misunderstandings.
Communication with ground crew and tower
Communication is key when working with the ground crew and tower to ensure a smooth takeoff and landing. In the glider cockpit, we rely on effective communication protocols and reliable radio equipment to stay connected. The table below provides an overview of the communication channels and frequencies used during different phases of the flight.
| Phase of Flight | Communication Channel | Frequency |
|---|---|---|
| Pre-flight | Ground Crew | VHF 123.45 |
| Taxiing | Ground Crew | VHF 123.45 |
| Takeoff | Tower | VHF 118.10 |
During pre-flight, I use the VHF radio to communicate with the ground crew, ensuring they are aware of any special instructions or requests. As we taxi to the runway, the ground crew remains in contact to provide any last-minute updates or clearances. Once ready for takeoff, I switch to the tower frequency, allowing me to receive important instructions and clearance for departure.
With communication established and protocols followed, we are ready to transition into the subsequent section about ‘takeoff and climb’ smoothly.
Takeoff and Climb
As a glider pilot, I’ve learned various techniques for achieving a smooth takeoff. One of the key factors is maintaining a proper control of the glider’s attitude during the initial acceleration phase. This ensures a gradual and steady lift off the ground.
Additionally, managing the glider’s climb rate is essential to optimize the ascent and maintain a safe flight profile. This involves adjusting the airspeed, manipulating the pitch angle, and making use of thermals and updrafts when available.
Techniques for a smooth takeoff
Before you take off, make sure to smoothly apply full throttle to gain enough speed for a successful launch.
Glider maintenance is crucial to ensure a safe and efficient flight. Regular inspections and repairs should be conducted to keep the glider in optimal condition.
Additionally, weather considerations play a vital role in the success of a takeoff. Assessing wind direction, speed, and any potential weather hazards is essential before embarking on a flight. Remember to check for any turbulence or unstable atmospheric conditions that could affect the glider’s performance. Understanding these factors will help you make informed decisions and ensure a smooth takeoff.
Now, let’s delve into managing the glider’s climb rate and how to optimize it for a successful flight.
Managing the glider’s climb rate
To maximize your glider’s climb rate, it’s important to adjust the pitch and throttle accordingly. Glider speed control is crucial for optimizing climb efficiency and getting the most out of your ascent.
As you begin your climb, it’s essential to maintain a proper airspeed that allows the glider to generate enough lift. This can be achieved by adjusting the pitch of the glider, which affects the angle of attack and the amount of lift produced.
Additionally, managing the throttle is important for maintaining a consistent climb rate. By carefully adjusting the throttle, you can control the power output and ensure a steady climb.
Proper glider speed control and optimizing climb efficiency will set you up for a successful flight. Now, let’s move on to discussing in-flight navigation and how to navigate effectively without getting lost.
In-Flight Navigation
The glider’s GPS system helps pilots navigate efficiently during flights. Equipped with advanced navigational instruments, the GPS technology provides accurate and real-time information to guide us through the skies.
Here are three key features of the glider’s GPS system:
-
Waypoint Navigation: With the GPS system, pilots can easily program waypoints into the flight plan. These waypoints are specific geographic coordinates that serve as markers along our intended route. By following these waypoints, we can stay on course and maintain a precise heading.
-
Terrain Awareness: The GPS system also includes terrain mapping capabilities, allowing us to visualize the surrounding landscape. This feature is especially crucial when flying in unfamiliar areas or near mountain ranges. It helps us avoid potential hazards and maintain a safe altitude.
-
Weather Tracking: Another invaluable aspect of the glider’s GPS system is its ability to track and display weather information. By monitoring weather patterns in real-time, we can make informed decisions about our flight path and adjust accordingly to avoid turbulent conditions.
With the glider’s GPS system guiding us through the skies, we can focus on mastering the art of soaring techniques, harnessing the natural elements to achieve optimal performance.
Soaring Techniques
When it comes to soaring techniques, one of the most crucial skills to master is finding and utilizing thermals. Thermals are columns of rising air that can provide glider pilots with the necessary lift to gain altitude.
In addition to thermals, ridge lift and wave lift are two other methods used to gain altitude during a flight. Ridge lift occurs when wind blows against a ridge or mountain, causing the air to rise and create lift. Wave lift, on the other hand, is created by the movement of air over mountain ranges, producing a series of waves that can be ridden by glider pilots.
How to find and utilize thermals
Finding and utilizing thermals is essential for glider pilots to gain altitude and extend their flight time. Thermals are pockets of warm air that rise from the surface, providing a natural lift for gliders.
To find thermal sources, pilots rely on visual cues such as cumulus clouds, soaring birds, and wind patterns. Once a thermal is located, the pilot maneuvers the glider into the thermal column and utilizes wind currents to climb higher.
By circling within the thermal, the glider can maximize the lift and gradually ascend. It is crucial for pilots to have a good understanding of the surrounding weather conditions and terrain to effectively find and utilize thermals.
With proper technique and skill, glider pilots can gain significant altitude using thermals, allowing them to explore new areas and extend their flight duration.
Transitioning into the subsequent section, ridge lift and wave lift are additional techniques that glider pilots employ to gain altitude without relying solely on thermals.
Using ridge lift and wave lift to gain altitude
Ridge lift and wave lift can be used by glider pilots to gain altitude and extend their flight time. When it comes to ridge lift techniques, it’s important to understand how to position the glider in relation to the ridge. By flying close to the ridge, the pilot can take advantage of the upward air currents that are deflected by the terrain. This requires precise control and constant adjustments to maintain the optimal position.
On the other hand, wave lift strategies involve locating areas where the wind interacts with mountain ranges or other obstructions, creating standing waves of lift. Pilots need to identify these wave systems and exploit them by flying in a pattern that allows them to ride the wave and gain altitude.
Maneuvering and Aerobatics
The glider pilot can perform aerobatic maneuvers to showcase the maneuverability of the aircraft. These advanced maneuvering techniques require precision and skill to execute safely. One such maneuver is the loop, where the glider climbs vertically, then rolls over the top, descending back down in a circular path.
Another impressive maneuver is the barrel roll, where the glider rotates around its longitudinal axis while maintaining a level flight path. These aerobatic maneuvers not only demonstrate the capabilities of the glider but also test the pilot’s ability to control the aircraft in extreme situations.
To perform aerobatics, the pilot must have a thorough understanding of the glider’s flight envelope and its limitations. They must also be proficient in controlling the glider at high speeds and in varying attitudes. This requires precise control inputs and a keen sense of situational awareness. Safety is paramount during aerobatics, and pilots undergo rigorous training to ensure they can perform these maneuvers without compromising the integrity of the aircraft.
Transitioning to emergency procedures, pilots must be prepared to handle unforeseen circumstances while flying. These can range from mechanical failures to adverse weather conditions. In the event of an emergency, pilots rely on their training to make quick and informed decisions to ensure the safety of themselves and the glider. By being well-versed in emergency procedures, pilots can effectively manage challenging situations and minimize the risk to themselves and the aircraft.
Emergency Procedures
When it comes to flying, unexpected situations can arise at any time, requiring quick thinking and decisive action.
In this discussion, I will delve into the key points of dealing with these unexpected situations and emergency landing techniques.
As a seasoned pilot, I have honed my skills in handling these challenging scenarios, and I will share my knowledge and technical expertise to help you navigate through these critical moments.
Dealing with unexpected situations
If you’re caught in a sudden downdraft, you can quickly adjust the glider’s pitch to regain control. Dealing with unexpected situations in the air is crucial for glider pilots.
One of the most common challenges is handling strong crosswinds. These powerful winds can push the glider off course and make it difficult to maintain a steady flight path. To counteract this, pilots must utilize their rudder controls to maintain proper alignment with the runway.
Additionally, equipment malfunctions can occur, which require quick thinking and decisive action. Whether it’s a jammed control surface or a failed instrument, pilots must rely on their training to troubleshoot and resolve these issues. Being prepared and staying calm is essential to ensuring a safe flight.
Now, let’s move on to emergency landing techniques, where we’ll discuss how to handle critical situations.
Emergency landing techniques
Emergency landing techniques can be a challenging aspect of pilot training. When faced with an emergency situation, quick thinking and precise execution are crucial to ensure the safety of both the pilot and the glider. Here are some key techniques and considerations for successful emergency landings:
-
Selecting a suitable landing spot: Assessing the terrain and identifying the best possible landing area is paramount. Factors such as wind direction, obstacles, and accessibility must be taken into account.
-
Maintaining airspeed: In emergency situations, it’s vital to maintain a safe airspeed to ensure control and stability of the glider throughout the landing process.
-
Executing the approach: A controlled descent with proper use of flaps and spoilers helps in managing the glider’s glide ratio and allows for a smoother landing.
-
Touchdown technique: Aiming for a gentle touchdown while minimizing groundspeed is essential to prevent damage to the glider and ensure a safe recovery.
-
Post-landing procedures: After landing, it’s crucial to secure the glider, assess any damage, and follow standard post-landing checklists.
Mastering these emergency landing techniques and understanding glider recovery procedures is vital for every pilot.
Transitioning seamlessly into the subsequent section about ‘landing and approach,’ it’s essential to consider the importance of precise maneuvers and careful planning during the landing and approach phase.
Landing and Approach
Planning the approach and descent is a crucial step in ensuring a safe and successful landing. As a pilot, I carefully analyze the wind direction, speed, and terrain to determine the best approach path.
During the descent, I maintain a steady glide angle and adjust my speed accordingly to ensure a smooth touchdown.
Planning the approach and descent
As you prepare for the approach and descent, you’ll want to ensure that your altitude and speed are properly controlled. Planning strategies and weather considerations are crucial factors in executing a safe and smooth landing. Here are some key points to keep in mind:
Planning strategies:
- Evaluate the wind direction and strength to determine the appropriate landing direction.
- Study the topography and landmarks around the landing area to find suitable ground references for judging distances.
Weather considerations:
- Check the weather forecast for any potential changes in wind conditions or turbulence that could affect your approach.
- Be aware of any precipitation or low-level clouds that may reduce visibility and require alternative landing options.
By carefully considering these planning strategies and weather considerations, you can optimize your approach and descent to ensure a safe and successful landing.
Now, let’s move on to executing a safe and smooth landing, focusing on the fine-tuning of your technique and control inputs.
Executing a safe and smooth landing
Now, it’s time for you to execute a safe and smooth landing by fine-tuning your technique and control inputs.
When it comes to landing a glider, one of the most challenging situations is dealing with crosswinds. To handle this effectively, you need to employ proper crosswind landing techniques. By using a combination of aileron and rudder inputs, you can maintain a straight path and prevent the glider from being pushed off course.
Additionally, maintaining landing gear in good condition is crucial for a safe landing. Regular inspection and maintenance of the landing gear, including the wheels, brakes, and shock absorbers, are essential to ensure they perform optimally during touchdown.
By prioritizing crosswind landing techniques and landing gear maintenance, you can ensure a secure and smooth landing every time.
Moving forward, let’s delve into the post-flight procedures.
Post-Flight Procedures
After landing, you’ll need to complete the post-flight procedures before leaving the glider cockpit. These procedures are essential to ensure the safety and proper maintenance of the aircraft.
The first step is to conduct a post-flight debrief with your flight instructor or fellow pilots. This debriefing allows you to discuss any issues or observations during the flight, providing valuable feedback for improvement.
Once the debrief is complete, it’s time to move on to the aircraft maintenance tasks. Start by inspecting the glider for any visible damage or signs of wear and tear. This includes checking the wings, control surfaces, landing gear, and other components. Take note of any discrepancies and report them to the maintenance team.
Next, it’s important to clean the cockpit and remove any debris or personal belongings. This ensures a tidy and organized space for the next pilot. Additionally, check the instruments and avionics for any abnormalities or malfunctions. If any issues are found, they should be reported to the maintenance team for further investigation and repair.
Finally, secure the glider by properly stowing the control surfaces, closing the canopy, and engaging the parking brake. These steps are crucial to prevent any accidental movement or damage to the aircraft while it is on the ground.
Frequently Asked Questions
What are the recommended clothing and equipment for a glider pilot?
As a glider pilot, I highly recommend wearing appropriate clothing such as a flight suit, sturdy shoes, and a helmet for safety. In terms of equipment, essential items include a parachute, radio, and navigation tools for accurate flying. Safety precautions for glider pilots are crucial to ensure a successful and secure flight.
How often should a glider undergo maintenance and inspections?
Glider maintenance frequency and inspection requirements are crucial for safe flying. Regular check-ups ensure the glider remains in top condition. Just like a well-tuned instrument, a glider needs periodic maintenance to perform flawlessly in the sky.
Are there any weight restrictions for passengers in a glider?
For safety reasons, there are weight restrictions for passengers in a glider. These restrictions ensure that the glider is not overloaded, which could affect its performance and maneuverability. As per safety guidelines, glider pilots must adhere to these restrictions.
Can a glider pilot fly at night?
Sure, I can fly a glider at night with proper training and adherence to safety regulations. Glider pilot training covers the techniques and equipment necessary for night flying, ensuring a knowledgeable and safe experience in the dark skies.
Do gliders have any communication systems onboard?
Glider cockpit communication systems are essential for safe flying. They allow me to communicate with other pilots and air traffic control, ensuring coordination and avoiding collisions. Communication is crucial in glider flying to maintain situational awareness and make informed decisions.
Conclusion
In conclusion, experiencing the glider cockpit firsthand has provided a deeper understanding of the intricate workings that go into flying this remarkable aircraft.
From the pre-flight checks to the post-flight procedures, every step is crucial for a safe and successful flight.
Maneuvering through the skies, following navigation techniques, and even performing aerobatics, all require precision and skill.
And in the event of any emergencies, knowing the correct procedures is essential.
Truly, being inside the glider cockpit is an immersive and exhilarating experience that showcases the beauty and complexity of aviation.