
After each flight, you should inspect your glider’s wings for cracks, dents, or debris, and clean the surfaces with a soft cloth. Check all bolts, fasteners, and control hinges for tightness and smooth operation. Examine the landing gear, tow hook, and release mechanism for damage or corrosion. Clean the canopy for clear visibility, and review your electronic equipment for issues. For more simple maintenance tips, keep exploring the details that help keep your glider safe and ready.
Key Takeaways
- Inspect wings and fuselage for damage, debris, and wear; clean surfaces with a soft cloth or brush.
- Check landing gear for wear, corrosion, tire pressure, and secure fasteners; lubricate hinges and moving parts.
- Examine control surfaces and hinges for damage, proper movement, and secure attachments; lubricate as needed.
- Clean the canopy, verify visibility, and inspect electronic equipment for damage, loose connections, and proper operation.
- Record maintenance observations, damage, or irregularities; review pre-flight checklist and document completed tasks.

FlightPro ProAviator Cockpit Yoke Mount and Suction Cup Set for iPads, General Aviation Avionics and Tablet Mounting
✈️ Versatile Mounting: This set includes a sturdy yoke mount and suction cup mount for securely attaching iPads...
As an affiliate, we earn on qualifying purchases.
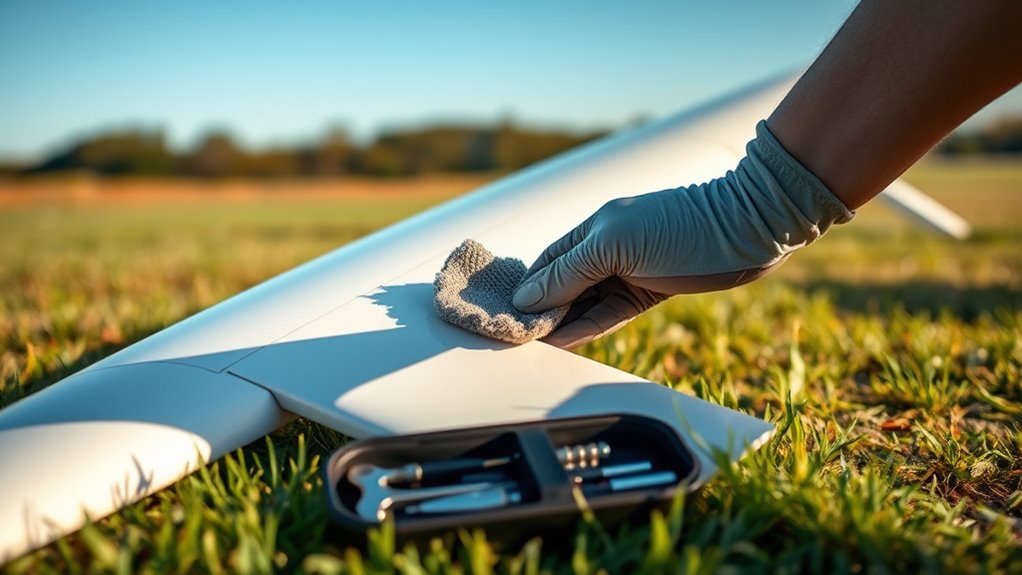
Inspect the Wing Surfaces for Damage or Debris
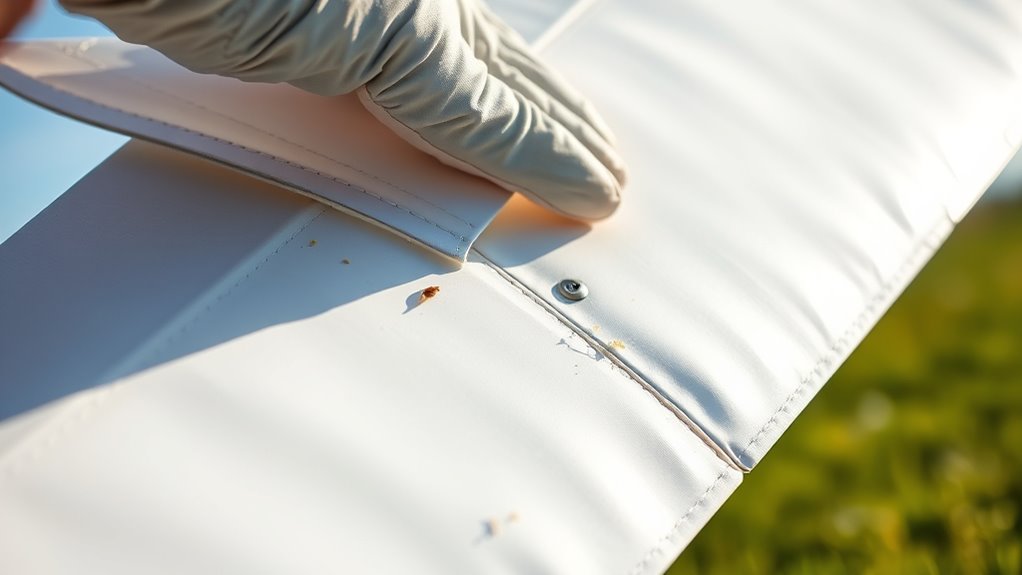
Before you fly, it’s essential to carefully inspect the wing surfaces for any damage or debris. Check the entire wing surface, looking for cracks, dents, or tears that could compromise flight safety. Remove any debris such as leaves, dirt, or insects that may have accumulated during your last flight. Use a soft cloth or brush to gently clean the surface, making certain nothing interferes with airflow. Pay close attention to the leading edge and wing tips, as these areas are most vulnerable to damage and debris buildup. Removing debris and inspecting for damage help maintain the wing’s integrity and performance. Regularly cleaning and checking the wing surface ensures your glider remains in top condition, ready for safe and smooth flights. Incorporating visual inspection techniques can further help identify potential issues early.

FlightPro ProAviator Suction Cup Mount - Curved Arm - Supports Multi Angle Display - for Pilots, General Aviation (ProAviator: iPad Mount)
Secure Suction Cup: Powerful suction for reliable attachment to any smooth surface in the cockpit.
As an affiliate, we earn on qualifying purchases.
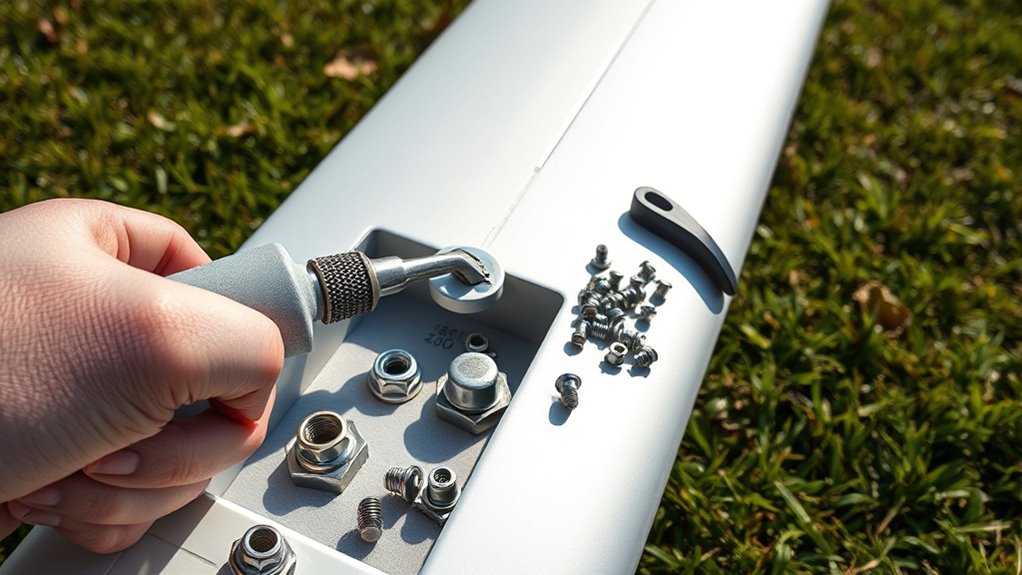
Check and Tighten Bolts, Nuts, and Fasteners
Start by inspecting critical connection points to guarantee all bolts, nuts, and fasteners are secure. Use proper tools carefully to tighten any loose components without damaging them. Keep a record of your maintenance checks to track when each part was last inspected and tightened. Additionally, verifying the stability of mounting hardware ensures safe operation and prevents potential malfunctions. Contrast ratio plays a key role in image quality, so maintaining secure components helps preserve optimal display performance.
Inspect Critical Connection Points
Regularly inspecting critical connection points guarantees your glider remains safe and secure. During a rig inspection, focus on all bolts, nuts, and fasteners, ensuring none are loose or damaged. Check cable tension carefully; loose cables can compromise control and safety. Tighten any connections that show signs of wear or looseness, but avoid over-tightening, which can cause damage. Pay close attention to attachment points that experience frequent stress. Maintaining proper tension and secure connections helps prevent in-flight issues and prolongs component life. Use your hands and visual checks to identify any abnormalities. Additionally, understanding the importance of Proper Maintenance Procedures can help you develop a thorough inspection routine. Regular inspections keep your glider in top condition, giving you confidence in its safety and performance after each flight.
Use Proper Tools Carefully
Using the right tools carefully is essential to guarantee bolts, nuts, and fasteners are properly checked and tightened without causing damage. Proper tools help you avoid stripping threads or damaging components, ensuring safety and longevity. Always select the correct size and type of tools for each fastener to prevent slipping or rounding off edges. Practice careful handling by applying steady, controlled force—don’t rush or use excessive torque. Regularly inspect your tools for wear or damage, replacing them as needed. Keep tools clean and well-maintained to ensure peak performance. When tightening fasteners, follow manufacturer torque specifications to prevent over-tightening or loosening. Employing attention to detail during maintenance tasks helps identify potential issues early and maintains consistent quality. Using proper tools with careful handling ensures your glider remains secure and ready for safe flights.
Record Maintenance Checks
Have you ever checked your glider’s bolts, nuts, and fasteners to verify they’re secure? Regular record maintenance checks help you stay ahead of potential issues. After each flight, review your pre-flight checklist to ensure all fasteners are tight and in good condition. Recording these checks keeps your maintenance routine organized and provides a history of your glider’s condition. When storing your glider, follow proper storage tips to prevent corrosion or loosening of fasteners, especially if it’s stored outside or in humid environments. Tighten any loose bolts or nuts during your post-flight inspection, and note these adjustments. Keeping detailed records ensures you catch problems early, prolongs your glider’s lifespan, and guarantees safer flights every time. Additionally, understanding maintenance intervals and adhering to manufacturer recommendations can help you plan timely inspections.

Dosvsi Tablet Yoke Mount, iPad Yoke Clamp Mount for Aircraft, 360° Adjustable Metal Arm Aviation Trainer Tablet Holder for iPad Pro 13 12.9 11, iPad Air Mini, Galaxy tab, iPhone, 4-13" Device
【Sturdy Yoke Clamp Base】The ipad mini yoke mount can securely attached to any handle bar/ pole/ rail from...
As an affiliate, we earn on qualifying purchases.
Examine the Control Surfaces and Hinges
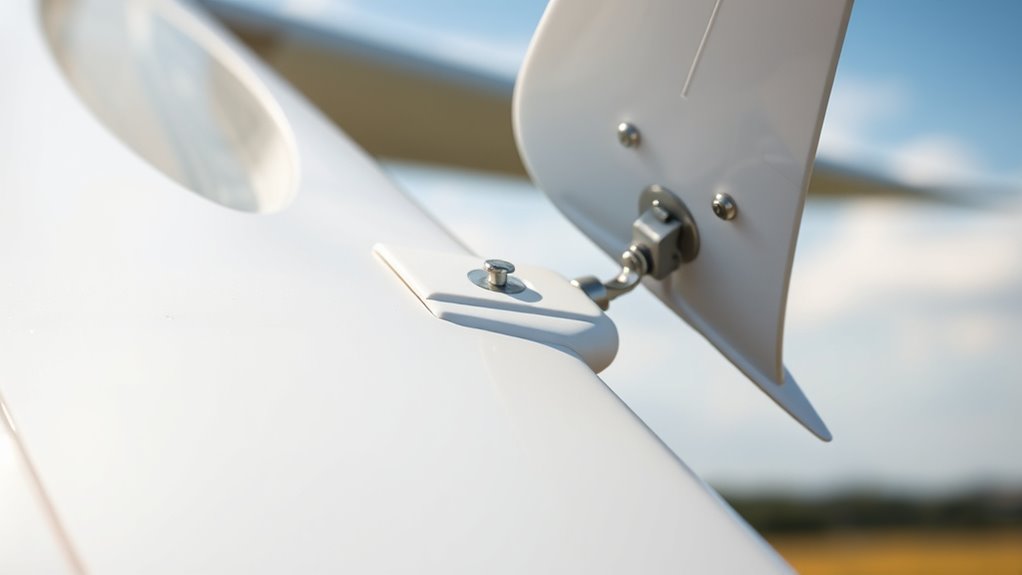
To verify your glider performs smoothly, it’s essential to carefully examine the control surfaces and hinges. Start with control surface inspections to check for any signs of damage, warping, or loose fittings. Ensure the ailerons, elevator, and rudder move freely without obstruction. Next, focus on hinge lubrication; properly lubricated hinges prevent sticking and reduce wear. Apply a suitable lubricant to hinge pins and pivot points, wiping away excess to avoid dirt buildup. Look for any corrosion or corrosion spots on hinges and control surfaces, addressing them promptly. Verify that all control surfaces are securely attached and respond correctly when moved. Regular inspections help maintain safe, efficient flight characteristics and extend the lifespan of your glider’s control system.

OHLPRO Tablet Holder for Pilot Aircraft Windshield, Anti-Vibration Suction Cup Aviation Mount, Fits 5-13" iPad Pro 12.9, Mini 6, Air & Thick Cases, Heavy Duty for Car Dashboard, Cockpit, Truck
【DESIGNED FOR PILOTS & REAL COCKPIT USE】 The OHLPRO pilot tablet holder is expertly engineered to mount your...
As an affiliate, we earn on qualifying purchases.
Clean the Canopy and Clear Visibility

Start by wiping the canopy gently to remove dust and smudges, ensuring your view stays clear. Check for any obstructions or debris that could hinder visibility during flight. Keeping the canopy clean is key to maintaining safe and unobstructed sightlines.
Wipe Canopy Gently
Cleaning the canopy gently is vital for maintaining clear visibility during flight. Use a soft, lint-free cloth to wipe the canopy carefully, avoiding scratches or streaks that can impair your view. Proper canopy cleaning ensures that dirt, bugs, and smudges don’t obstruct your sightlines, which is essential for safe flying. When wiping, use a mild, non-abrasive cleaning solution designed for clear plastic surfaces. This simple step promotes visibility enhancement and preserves the integrity of the canopy material. Avoid applying too much pressure or using rough materials that could scratch the surface. Regular, gentle cleaning after each flight keeps your canopy clear and your visibility sharp, helping you stay aware of your surroundings and respond quickly to any changes during flight.
Check for Obstructions
Regularly inspecting your canopy for obstructions helps maintain clear visibility during flight. Birds migrating nearby or changing weather patterns can deposit debris or cause smudges that impair your view. To guarantee safety, check for common obstructions such as:
- Dust, dirt, or bugs on the canopy surface
- Tree sap or bird droppings after flight
- Scratches or cracks that might distort vision
- Loose or damaged canopy seals
- Debris from nearby weather events or bird migration routes
Cleaning these ensures your sightlines stay unobstructed, especially during unpredictable weather changes or bird migration seasons. Clear visibility is vital for safe navigation and smooth landings. Taking a few minutes to verify and clean your canopy prevents surprises during your next flight. Incorporating proper maintenance routines helps prolong the life of your canopy and ensures consistent performance.
Verify the Condition of the Landing Gear
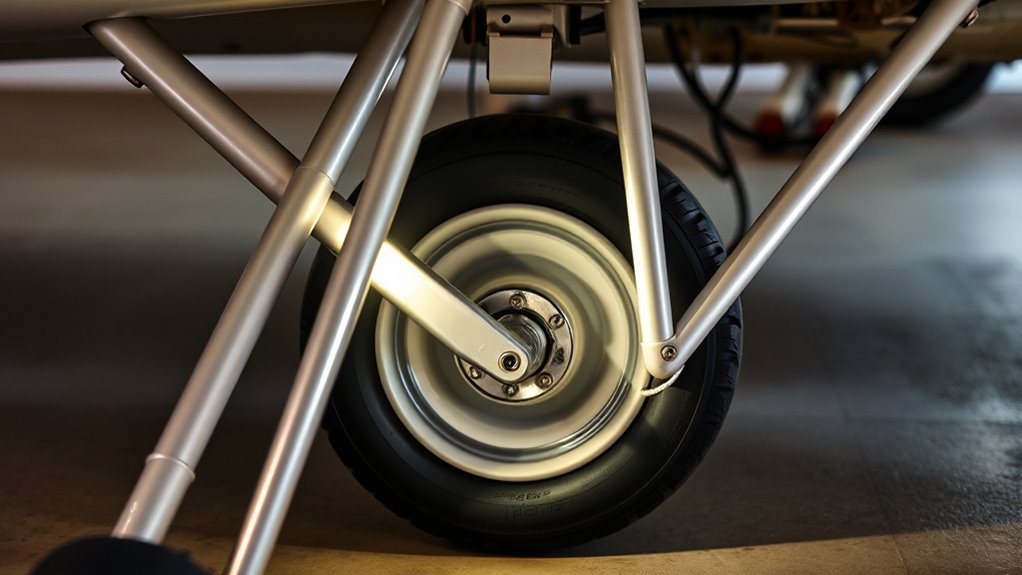
Before flying, you should thoroughly verify the condition of the landing gear to guarantee safety and proper functionality. Start by inspecting for any signs of damage, corrosion, or wear on the wheels and struts. Check the tire pressure and ensure it matches the manufacturer’s specifications; proper tire pressure is essential for safe landings and takeoffs. Next, look for leaks or cracks in the landing gear components. Perform landing gear lubrication if needed, applying grease to hinges and moving parts to prevent rust and ensure smooth operation. Confirm that all bolts and fasteners are secure. A quick but thorough inspection like this helps prevent potential issues during flight, maintaining your glider’s safety and reliability. Additionally, reviewing celebrity lifestyle insights related to maintenance routines can offer helpful tips on keeping your equipment in top condition.
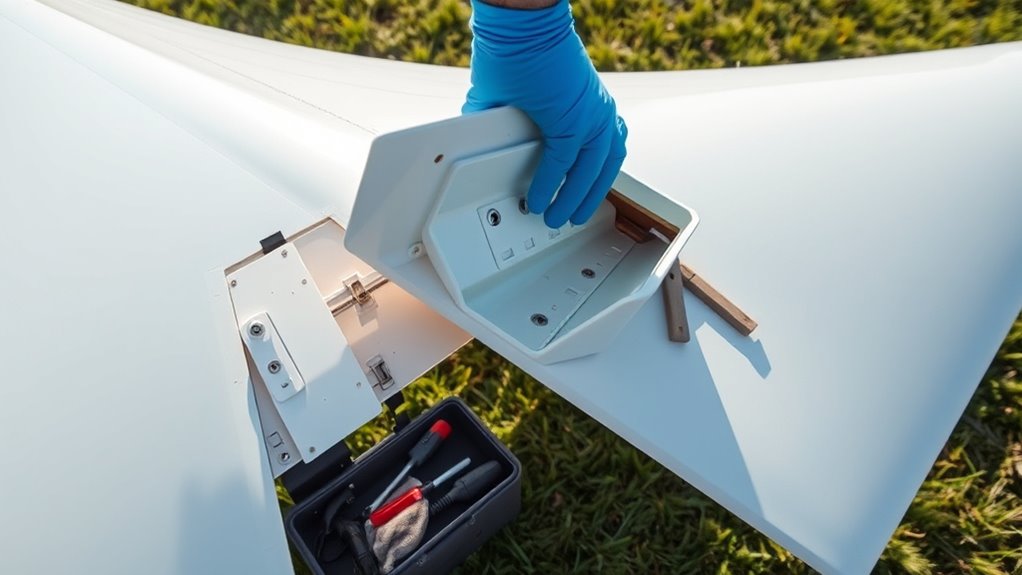
Inspect the Tow Hook and Release Mechanism

To guarantee safe and reliable launching, you need to carefully inspect the tow hook and release mechanism for any signs of damage or wear. Conduct a thorough tow hook inspection by checking for cracks, corrosion, or deformation. Ensure the release mechanism check involves verifying that it moves freely and locks securely. Look for corrosion, dirt buildup, or bent components that could compromise performance. Confirm all fasteners are tight and undamaged. Test the release mechanism’s operation to ensure it engages and releases smoothly without resistance. Remember, a faulty tow hook or release system can lead to dangerous situations, so never skip this step. Regular inspections help catch issues early, keeping your launches safe and smooth. Additionally, understanding and adhering to safety guidelines is crucial for preventing accidents and ensuring a secure flying experience.
Review the Instrument Panel and Electronic Equipment

Ensuring your instrument panel and electronic equipment are functioning properly is crucial for a safe and efficient flight. After landing, take a few moments to check all displays and gauges on your instrument panel. Confirm that your altimeter, airspeed indicator, and variometers are readable and show consistent readings. Inspect electronic equipment such as GPS units, radios, and flight computers for any signs of damage or loose connections. Make sure all screens are clear, and buttons or switches operate smoothly. Look for any warning lights or error messages that may indicate issues needing attention. Properly reviewing your instrument panel and electronic equipment helps you catch potential problems early, ensuring your glider remains reliable and ready for your next flight. Additionally, understanding sound healing science can help you stay calm and focused during pre-flight checks by promoting mental clarity and relaxation.
Document Any Observations or Maintenance Needs
Keeping a detailed record of any observations or maintenance needs is essential for maintaining your glider’s safety and performance. After each flight, review your pre flight checklist and note any issues or unusual findings in your pilot notes. This documentation helps track recurring problems and guides future inspections. Be sure to record:
- Any visible damage or wear on the wings or fuselage
- Malfunctions or irregularities in electronic equipment
- Changes in control responsiveness
- Observations from the flight, such as unusual sounds or vibrations
- Maintenance tasks completed or required before the next flight
- Utilizing detailed record-keeping practices can help identify patterns and prevent overlooked issues.
Accurately documenting these details ensures you don’t overlook critical issues and maintains a clear maintenance history for your glider. This habit promotes safety and prolongs your aircraft’s lifespan.
Frequently Asked Questions
How Often Should I Perform Post-Flight Glider Inspections?
You should perform post-flight glider inspections after each flight to guarantee safety and readiness. This involves reviewing your pre-flight checklist to spot any issues and following storage best practices to protect your equipment. Regular inspections help identify wear or damage early, preventing potential problems. Make it a habit to check the glider thoroughly after every flight, maintaining your aircraft’s condition and ensuring safe, enjoyable flying experiences.
What Tools Are Recommended for Glider Maintenance Checks?
Tools are like your trusty toolbox’s heartbeat, vital for thorough checks. You’ll want a tools checklist that covers all necessary items, like screwdrivers, wrenches, and inspection mirrors. Regular maintenance scheduling guarantees you don’t miss essential checks. Keep your tools organized and in good condition so you can quickly perform safety inspections, identify issues early, and keep your glider flying smoothly. Proper tools make maintenance safer and more effective.
How Do I Identify Signs of Corrosion on Metal Parts?
To identify signs of corrosion on metal parts, look for discoloration, rust, or bubbling paint. You should regularly inspect joints, fasteners, and exposed surfaces. Corrosion prevention involves cleaning metal surfaces with appropriate metal treatment products and applying protective coatings. Promptly address any corrosion to prevent further damage. Keeping your glider dry and storing it properly also helps prevent corrosion, ensuring your aircraft remains safe and in top condition.
What Is the Proper Way to Dispose of Damaged Components?
Disposing of damaged components isn’t just a quick toss; it’s a mission to save the planet! You should always follow proper procedures, like ensuring hazardous waste is handled carefully and not dumped irresponsibly. Recycle components whenever possible, preventing environmental disaster. Never throw damaged parts in regular trash — instead, take them to designated recycling centers or follow your local regulations for component recycling. Protect the environment by doing it right!
Are There Specific Maintenance Records I Should Keep?
You should keep detailed maintenance records, including a maintenance log, to track all repairs and inspections. Following your inspection schedule guarantees safety and compliance. Record the date, work performed, and any parts replaced. This helps you identify recurring issues and maintain proper documentation for future reference or inspections. Consistently updating your maintenance log makes it easier to stay organized and ensures your glider remains airworthy.
Conclusion
After your flight, taking a few minutes to perform these simple maintenance checks keeps your glider in top shape. Isn’t it worth ensuring safety and performance for your next flight? Regular post-flight inspections help catch small issues before they become big problems. By staying proactive, you extend your glider’s lifespan and enjoy more confident soaring adventures. So, why not make these quick checks a routine part of your flying routine? Your glider—and you—will thank you.