
To spot dry versus moist thermals in real time, look at ground surface features like uneven terrain or dry, rocky areas for dry thermals, and moist valleys or vegetated spots for moist ones. Watch cloud formations: thick, fluffy clouds suggest moist thermals, while wispy or broken clouds point to dry conditions. Listen and feel the airflow—moist thermals often produce a hum and feel denser, dry ones are crisper. Keep observing these signs as you fly to tell them apart more confidently.
Key Takeaways
- Observe cloud texture: wispy, fibrous clouds indicate moist thermals; broken or turbulent clouds suggest dry thermals.
- Listen for sounds: moist thermals produce resonant hums; dry thermals often emit high-pitched or sharper sounds.
- Feel airflow: denser, turbulent air points to moist thermals; crisper, lighter airflow signals dry thermals.
- Monitor surface conditions: warm, uneven terrain with moisture suggests moist thermals; rocky, dry surfaces favor dry thermals.
- Watch for dust devils and cloud growth: active, spreading clouds imply moist conditions; sparse, broken clouds indicate drier thermals.
Recognizing Visual Cues From the Ground

To identify suitable thermals from the ground, you need to pay close attention to visual cues that indicate rising air currents. Start by observing the ground surface; areas with uneven terrain, sparse vegetation, or patches of warmer soil often suggest warmer air rising. Look for signs like dust devils or small wisps of disturbed dust, which can signal upward movement. Wind direction is also vital: if wind consistently blows from a specific area and you notice slight turbulence or movement on the ground, it can help locate where thermals are forming. Changes in wind patterns near the ground, such as shifting directions or localized gusts, often mark the edges of thermals. Additionally, understanding the thermal formation process can assist in better predicting rising air currents. By combining these visual cues with wind observations, you can better pinpoint rising air currents for effective soaring.
Observing Cloud Formation and Characteristics

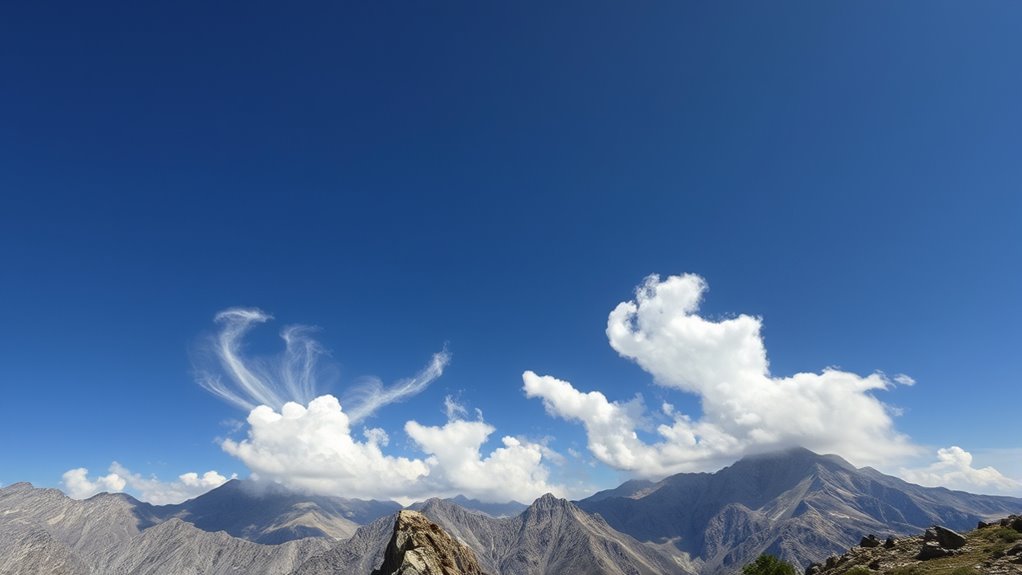
When observing clouds, look for specific types that indicate different thermal conditions. Pay attention to their visual textures—smooth, wispy, or billowy—as these clues reveal moisture levels. Recognizing these indicators helps you understand the nature of the thermals supporting the clouds.
Cloud Type Indicators
Observing cloud formation and characteristics provides valuable clues about the type of thermals present. You can assess thermal stability by noting cloud density and shape. Dense, towering clouds like Cumulonimbus suggest moist, unstable conditions, indicating moist thermals. Conversely, wispy, thin clouds such as Cirrus point to stable, dry conditions with dry thermals. The presence of scattered, fair-weather clouds signals moderate stability, often associated with dry thermals. Pay attention to how clouds develop—rapid vertical growth indicates moisture and instability, while slow or minimal growth suggests dryness. Recognizing these cloud type indicators helps you determine whether the environment favors dry or moist thermals, aiding in real-time decision-making during flight or observation.
- Feel the thrill of spotting towering, dense clouds signaling moist thermals.
- Notice the delicate, wispy clouds hinting at dry, stable conditions.
- Recognize rapid cloud growth as a sign of instability and moisture.
- Detect minimal cloud movement revealing dry, stable air.
Visual Texture Clues
Cloud textures offer immediate visual clues about thermal conditions. When observing cloud formation, look for the texture and density that indicate thermal convection levels. Moist thermals typically produce clouds with a soft, fibrous, or wispy appearance, reflecting high atmospheric moisture that supports sustained cloud growth. Conversely, dry thermals often create clouds with a more turbulent, broken, or granular texture, showing limited moisture availability. The smoothness or roughness of cloud surfaces can reveal how much moisture the thermal interacts with as it rises. Recognizing these visual cues helps you determine whether the thermal is moist or dry, allowing for real-time assessment of atmospheric moisture content and thermal strength. Quick observation of cloud textures enhances your ability to interpret thermal behavior efficiently.
Analyzing Thermals’ Behavior and Movement

Understanding how thermals behave and move is essential for predicting their usefulness in gliding or soaring. By observing their patterns, you can refine your soaring strategies and improve efficiency. Watch for how thermals rise, spread, or wobble—these movements reveal their strength and type. Active thermal mapping helps you anticipate where lift will be strongest and how it shifts over time. Recognize signs like swirling motions or rapid changes in altitude to adapt your flight path. Staying alert to thermal behavior keeps you ahead, maximizing your glide and energy conservation. Additionally, noting the thermal strength can guide you in choosing the optimal moments to ascend or glide onward.
Detecting Temperature Changes and Humidity Signs

As you track thermals’ behavior and movement, paying close attention to temperature and humidity changes can give you early clues about lift formation. A rise in temperature at the surface often indicates thermal instability, signaling the potential for rising air. Conversely, stable thermal conditions suggest less vertical movement. Monitoring humidity signs is equally important; increasing moisture content in the air can point to moist thermals, which tend to be more vigorous and longer-lasting. A sudden drop in humidity might indicate dry thermals, which are less stable and produce weaker lift. By observing these subtle shifts in temperature and humidity, you can better predict whether a thermal is dry or moist, helping you optimize your flight path and stay ahead of lift developments. Additionally, understanding the color accuracy of your thermal cues can improve your interpretation of environmental conditions.
Noticing Differences in Lift Strength and Duration

Differences in lift strength and duration become apparent when you observe how dry and moist thermals behave during your flight. Dry thermals often have higher thermal energy, providing strong, steady lift that lasts longer. Moist thermals, with higher thermal conductivity, tend to produce weaker, more unpredictable lift that dissipates quickly. You might notice that dry thermals feel more robust and consistent, while moist ones fluctuate and fade faster. Recognizing thermal conductivity can help you anticipate the behavior of different thermals and adjust your flying strategy accordingly. – Feel the intensity: dry thermals deliver a powerful, persistent lift that energizes you. – Sense the change: moist thermals offer fleeting, inconsistent support. – Observe the thermal energy: dry thermals hold their strength longer. – Recognize the pattern: moist thermals often weaken rapidly due to efficient thermal conductivity.
Using Onboard Instruments and Instruments Readings

When observing how dry and moist thermals behave, your onboard instruments become invaluable tools for gaining precise insights. By monitoring thermal energy levels, you can identify the strength and potential longevity of a thermal. Instruments like variometers and temperature sensors help you detect changes in lift, revealing whether a thermal is dry or moist. Additionally, readings of atmospheric stability, such as wind, humidity, and temperature profiles, inform you about the thermal’s nature. Moist thermals often show higher thermal energy due to moisture content, which enhances lift. Conversely, dry thermals rely more on temperature differences and atmospheric stability. Using these onboard tools allows you to make real-time decisions, optimizing your flight path and conserving energy while effectively distinguishing between dry and moist thermals. Incorporating AI in Business can further enhance data analysis, providing predictive insights to improve thermal identification strategies.
Interpreting Surface Conditions and Land Features

You can identify thermal sources by observing surface material indicators like grass, bare soil, or water. Landform features such as ridges, valleys, and slopes also influence where thermals form and rise. Recognizing these factors helps you better interpret surface conditions and anticipate thermal activity. Additionally, understanding Honda Tuning modifications can aid in predicting how different terrains and surface conditions may affect thermal behavior during flight.
Surface Material Indicators
How can you identify surface conditions by examining the land features beneath you? Pay close attention to surface composition and vegetation patterns. These clues reveal thermal moisture levels and surface dryness. A thorough understanding of surface characteristics can also aid in developing effective sound therapy techniques, especially when considering environmental factors that influence auditory processing.
Landform Influence Factors
Landforms considerably shape surface conditions and influence thermal behavior across the landscape. You’ll notice that rock formations, such as cliffs or ridges, can direct airflow and affect where thermals form. These features often create localized areas of increased or decreased soil moisture, impacting thermal strength. For example, valleys may trap moisture, resulting in moist thermals, while exposed rocky surfaces dry out quickly, producing dry thermals. The type of landform determines how surface heat is absorbed and released, affecting the development of rising columns of warm air. Recognizing these influences helps you interpret thermal signals more accurately. By understanding how rock formations and soil moisture interact with land features, you can better predict whether thermals will be dry or moist, improving your real-time thermal identification. Additionally, landform types can influence wind patterns, further affecting thermal development and behavior.
Understanding Weather Patterns and Atmospheric Conditions

Understanding weather patterns and atmospheric conditions is essential for predicting thermal activity and flight safety. When you grasp how thermal convection works, you can better anticipate where dry or moist thermals will form. Atmospheric stability influences how strong or weak these thermals become, shaping your flying experience. Recognizing signs of unstable conditions can help you seize ideal lift zones, while stable air might signal calmer flights. Popular juice brands offer low-calorie options that can keep you refreshed during long flight days.
Be aware of these critical factors:
- Changes in cloud cover indicate shifting atmospheric stability.
- Temperature gradients signal potential thermal development.
- Wind patterns affect the strength and organization of thermals.
- Sunlight heating the ground creates the energy for thermal convection.
Mastering these elements keeps you prepared and confident in every flight.
Differentiating by the Thermal’s Sound and Feel

As you experience a thermal, pay attention to its sound—does it produce a gentle hum or a sharper crackle? Feel the airflow around you—smooth and steady or turbulent and rough—and notice how the thermal’s touch changes during your flight. These sensations can help you distinguish between dry and moist thermals effectively.
Thermal’s Acoustic Signatures
Thermals often reveal themselves through subtle acoustic cues that can help you distinguish between dry and moist conditions. Your sense of sound patterns and acoustic signatures is a powerful tool in real-time identification. As you approach a thermal, listen carefully—moist thermals tend to produce deeper, resonant hums, while dry thermals often emit sharper, high-pitched sounds. The texture of these sounds can tell you a lot about the moisture content in the air, even before visual cues become clear.
- Feel the vibrations under your feet, as moist thermals often feel more solid and consistent.
- Notice any faint crackling or rumbling—these often indicate moisture levels.
- Pay attention to the duration and tone of the sounds—longer, mellow acoustic signatures suggest moist conditions.
- Trust your ears to pick up subtle differences that reveal the thermal’s true nature.
Airflow Sensations During Flights
When flying through a thermal, your sensation of airflow can reveal whether it’s moist or dry. Moist thermals often have higher thermal conductivity, making the air feel more humid and sticky, with a subtle dampness on your skin. You might notice a slight increase in thermal expansion of the surrounding air, creating a denser, more turbulent feel. Dry thermals, on the other hand, tend to have lower thermal conductivity, resulting in crisper, more brittle airflow sensations. The air may feel lighter, less sticky, with a sharper, more defined flow. You might also hear a faint, sharper sound from the air moving over your wings, indicating different thermal properties. These sensations can help you distinguish between moist and dry thermals in real time, guiding your flight decisions.
Changes in Thermal Feel
Changes in thermal feel are often most noticeable through the sound and tactile sensations you experience while flying. You might sense a subtle shift in thermal scent, signaling a changeover from dry to moist air. As you enter a moist thermal, you may notice a slight increase in thermal coloration—perhaps a darker or more vibrant hue—accompanying a softer, more muffled sound. Conversely, dry thermals often feel sharper and crisper, with a distinct scent of dry earth or vegetation. These sensations can trigger an emotional response, making you more aware of your environment.
- Feel the thermal shift as a gentle, comforting embrace or a crisp, invigorating snap
- Detect the subtle scent changes that hint at moisture levels
- Notice coloration changes that visually reinforce thermal type
- Experience sound variations that deepen your connection to the thermal environment
Applying Practical Observation Techniques in Flight

To effectively apply practical observation techniques in flight, you need to develop a keen awareness of your environment and how the air responds around you. Watch for signs of thermal turbulence, which indicates active thermals, and note changes in thermal stability. When thermals are stable, the air feels smooth, and lift is consistent, making it easier to identify dry versus moist thermals. Unsteady air or sudden bumps suggest stronger thermal activity, often associated with moist thermals. Observe your aircraft’s behavior and how it reacts to the environment—sharp shifts or turbulence can reveal the thermal type. Clear visual cues, such as cloud formation or dust devils, also help confirm your observations. Developing this awareness allows you to optimize your flying strategy and better anticipate thermal behavior.
Frequently Asked Questions
How Does Altitude Affect Thermal Moisture Levels?
Altitude effects play a key role in thermal moisture levels, causing moisture variability as you ascend. Higher altitudes generally have lower humidity, making thermals drier, while lower altitudes tend to be more humid, resulting in moister thermals. You’ll notice this in real time, as thermals at different heights change in moisture content. Understanding these altitude effects helps you better anticipate thermal conditions, improving your flight efficiency and safety.
Can Terrain Influence the Identification of Dry Versus Moist Thermals?
Terrain influence plays a significant role in thermal variability, affecting how you identify dry versus moist thermals. You’ll notice that ridges, valleys, and varying land surfaces create different thermal patterns, making some thermals more distinct. Flat areas might produce less thermal activity, while rugged terrain can lead to more unpredictable thermal behavior. By observing these terrain effects, you can better distinguish between dry and moist thermals during your flight.
Are There Specific Times of Day Optimal for Detecting Moist Thermals?
You should focus on detecting moist thermals during mid-morning to early afternoon when thermal imaging reveals strong, rising warm air. Weather patterns like clear skies and stable humidity levels enhance visibility. At this time, moist thermals are most active, making them easier to spot. By paying attention to these conditions, you increase your chances of successful detection, as moist thermals tend to be more prominent in well-defined weather patterns.
How Do Seasonal Variations Impact Thermal Moisture Content?
You notice seasonal shifts influence thermal moisture content, causing moisture fluctuations that directly impact thermal visibility. During spring and summer, higher temperatures and humidity increase moisture, making thermals more moist and easier to identify. Conversely, in fall and winter, cooler, drier air reduces moisture levels, making thermals drier and harder to detect. These seasonal variations guide your flying strategies, helping you anticipate thermal types and optimize your flight efficiency.
What Role Does Local Vegetation Play in Thermal Formation?
You should consider how local vegetation influences thermal formation. Dense vegetation and thick canopy cover affect how sunlight heats the ground, creating temperature variations. High vegetation density can shade the surface, reducing heat buildup and altering thermal patterns. Conversely, sparse vegetation allows more direct sunlight, promoting stronger thermals. Recognizing these effects helps you predict thermal development, as vegetation density and canopy cover profoundly shape the thermal environment in your area.
Conclusion
By paying close attention to ground cues, cloud features, and thermal behavior, you can confidently distinguish between dry and moist thermals in real time. These observations help you optimize your flight and stay safe. So, next time you’re soaring, ask yourself: aren’t the subtle signs around you the key to uncovering better lift? With practice, you’ll develop an intuitive feel for each thermal’s nature, turning awareness into your greatest flying advantage.